

Adobe After Effects has long reigned as the industry standard for motion graphics, visual effects, and digital compositing. While audio editing is rarely the primary reason an artist launches the application, navigating sound within After Effects remains an essential skill for motion designers, video editors, and multimedia artists. Whether timing kinetic typography to a pulsing beat, syncing explosive sound effects to visual impacts, or generating dynamic visualizers driven by audio data, understanding how After Effects handles sound can significantly streamline post-production workflows.
For many years, the conventional wisdom in professional post-production environments dictated a strict separation of duties: video and motion graphics should be handled in applications like After Effects or Premiere Pro, while dedicated digital audio workstations (DAWs) such as Adobe Audition, Pro Tools, or Apple Logic Pro should manage sound design, mixing, and mastering. However, modern tight deadlines and rapid turnaround times often force creators to handle preliminary sound placement, basic mixing, and audio-reactive animations directly inside their motion graphics timelines. This comprehensive guide explores the foundational techniques, essential shortcuts, practical effects, and advanced automation workflows necessary for managing audio successfully within Adobe After Effects.
Navigating Interface Panels for Audio Management
Effective sound management in After Effects begins with configuring the workspace to display the necessary monitoring tools. Unlike a dedicated audio suite equipped with multi-track mixing boards and extensive metering plugins, After Effects offers streamlined panels designed primarily for playback verification and level monitoring.
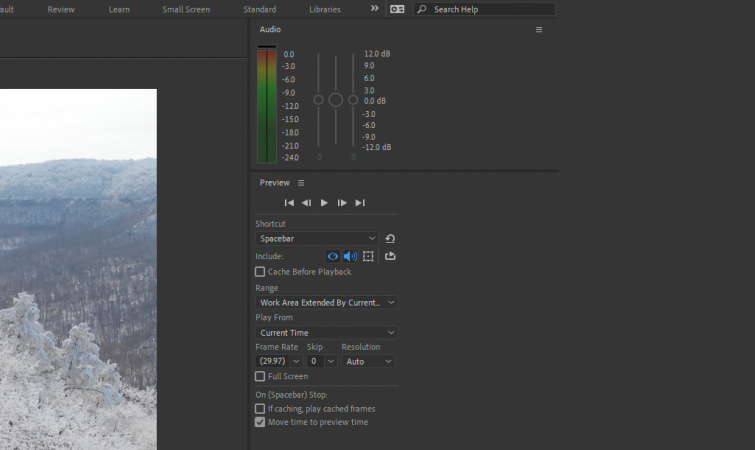
The Audio Panel serves as the primary tool for monitoring sound levels during composition playback. Users can access this panel by navigating to Window > Audio. Within this interface, artists can observe the decibel levels of active audio tracks in real time and adjust the playback volume. It is crucial to note that adjustments made within the Audio Panel affect only the playback preview and do not alter the actual gain or volume levels of the exported master file.

Complementing the Audio Panel is the Preview Panel, accessible via Window > Preview. This control center governs how compositions are rendered and previewed, allowing users to toggle audio output on or off during playback. Ensuring that audio is enabled in the Preview Panel is often the first troubleshooting step when sound fails to register during a timeline playback test.
Essential Keyboard Shortcuts for Efficient Audio Workflow
Speed and precision are paramount in professional video editing and motion design. Relying solely on mouse navigation can severely disrupt a creator’s rhythm. After Effects incorporates several indispensable keyboard shortcuts tailored specifically for audio navigation, timeline scrubbing, and layer manipulation.
The standard spacebar triggers a basic preview of the composition, provided that audio playback is properly enabled in the Preview Panel. For heavier compositions containing complex effects and unrendered visual layers, pressing the "0" key on the numeric keypad initiates a RAM Preview. This function processes both video and audio frames into the computer’s random-access memory, ensuring smooth, real-time playback without stuttering or frame drops.
When an artist wishes to evaluate only the audio elements without processing visual data, pressing the "." (period) key on the numeric keypad initiates an Audio-Only preview. This feature is particularly useful when fine-tuning dialogue cuts, sound effect placements, or musical pacing independent of visual distractions.
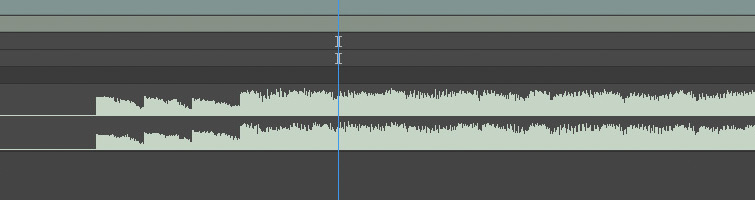
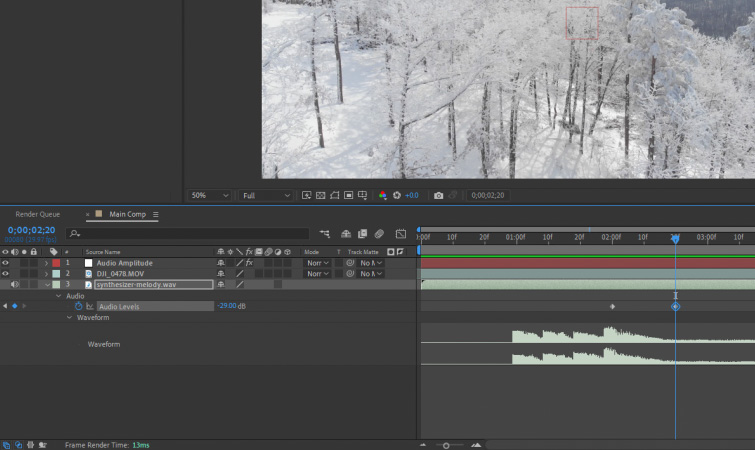
Furthermore, locating and managing audio waveforms is significantly accelerated through a simple keystroke shortcut. By selecting an audio layer in the timeline and pressing the "L" key twice in rapid succession, After Effects instantly toggles open the audio waveform. Pressing "L" once reveals the specific audio level property, while double-tapping exposes the visual representation of the sound waves, allowing editors to pinpoint exact audio transients, percussion hits, and speech patterns without expanding complex layer dropdown menus.
Managing Audio Layers, Keyframing, and Waveform Editing
Once an audio file is imported and placed into a composition, users gain immediate control over its basic properties. The speaker icon located to the far left of each audio layer acts as a master mute switch, enabling or disabling the sound output for that specific track. Twirling open the layer disclosure triangle reveals standard transformation and audio parameters, specifically Audio Levels and Waveforms.
Audio levels can be dynamically altered over time using keyframes. By placing keyframes on the Audio Levels property, editors can execute smooth fades, volume drops during dialogue scenes, or dramatic audio swells. As keyframes are adjusted, the visual waveform in the timeline dynamically updates to reflect the changing volume, providing immediate visual feedback of the audio envelope.
A common pitfall for editors transitioning from traditional non-linear editors (NLEs) like Premiere Pro to After Effects is relying on real-time audio playback for precise editing. Due to rendering overhead and buffering delays, audio playback in After Effects can occasionally suffer from a slight latency issue. Consequently, attempting to cut clips or align visual impacts directly to heard audio beats can lead to synchronization errors. Professional workflow standards strongly advocate for editing and aligning markers based strictly on the visual waveform rather than relying solely on real-time auditory feedback. The peaks and troughs of the waveform provide an absolute, unyielding reference point for precise alignment.
Utilizing Built-in Audio Effects in After Effects
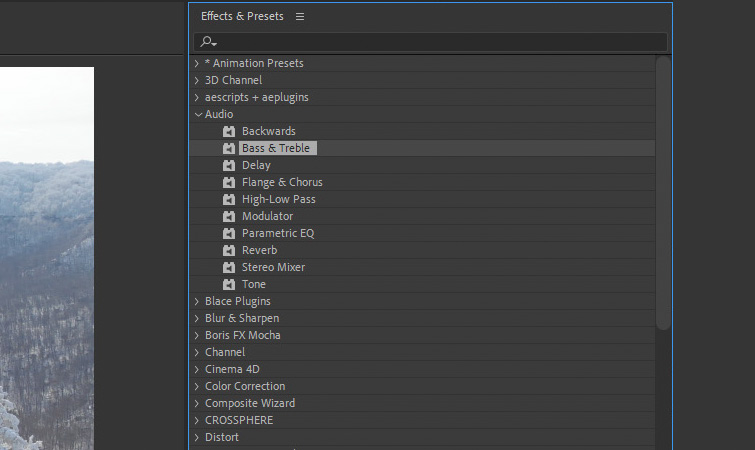
While After Effects is not a comprehensive audio mixing suite, it does include a modest collection of built-in audio effects designed for quick, minor adjustments. These effects can be found by navigating to Effects > Audio within the top menu bar.
Among the available options are Bass & Treble, Reverb, and Stereo Mixer. The Bass & Treble effect allows creators to quickly boost low-end warmth or crisp high frequencies without jumping into an external DAW. The Reverb effect can add spatial depth and environmental acoustics to dry voiceovers or sound effects, while the Stereo Mixer manages channel balancing and panning.
Industry professionals generally advise that complex sound design, noise reduction, equalization, and final mastering should be executed in dedicated audio software like Adobe Audition or Premiere Pro. However, having immediate access to basic audio filters directly within After Effects provides a valuable safety net when making rapid, on-the-fly adjustments during client review sessions or tight post-production crunches.
Transforming Audio Waveforms into Animation Keyframes
One of the most powerful and distinctive audio features within Adobe After Effects is the ability to convert audio waveform amplitudes into actionable keyframe data. This capability bridges the gap between sound and motion graphics, allowing artists to drive visual parameters—such as scale, position, opacity, or effect intensity—directly from the beat and rhythm of a musical track or voiceover.
To initiate this process, an artist right-clicks on the audio file within the composition timeline, navigates to Keyframe Assistant, and selects Convert Audio to Keyframes. Upon execution, After Effects generates a new Null Object layer titled Audio Amplitude.
When inspecting the properties of this newly created Null Object, users discover three distinct sliders containing dynamically generated keyframed values: Left Channel, Right Channel, and Both Channels. These numerical values correspond precisely to the volume and intensity of the audio track across the timeline. Artists can examine these data points in detail using the Graph Editor view, observing how peaks in the music translate into high numerical values.
To utilize this data, designers typically employ expression links (using the pick whip tool) to connect properties of other visual layers—such as the scale of a graphic equalizer bar, the glow intensity of a text layer, or the distortion amount of a background element—to the slider values of the Audio Amplitude null object. This technique automates complex, music-driven animations that would otherwise require tedious manual keyframing.
Sourcing High-Quality Sound Effects for Cinematic Impact
Visual excellence in motion design is only half of the equation; immersive sound design is what truly elevates a project from amateur to professional grade. Incorporating high-impact sound effects—such as deep cinematic sub-drops, sharp risers, whooshes, and mechanical impacts—can dramatically enhance the perceived production value of video trailers, promotional spots, and motion graphics packages.
Industry platforms frequently offer curated collections of royalty-free sound effects designed specifically to give video trailers and cinematic projects maximum emotional resonance. Integrating these sonic elements thoughtfully alongside meticulously timed visual effects ensures a cohesive sensory experience for the viewer.
Broader Industry Implications and Future Outlook
The continuous integration of cross-media capabilities within Adobe’s Creative Cloud ecosystem reflects a broader industry trend toward unified, multi-disciplinary workstations. While specialized tools will always hold a vital place in professional pipelines, the ability of motion designers to handle fundamental sound mixing, audio-reactive animation, and timing directly within After Effects maximizes efficiency and creative exploration.
As digital media consumption continues to accelerate across platforms prioritizing fast-paced, highly synchronized visual and auditory content—such as social media reels, dynamic advertisements, and interactive web experiences—the demand for streamlined audio-visual workflows will only intensify. By mastering these foundational audio tools, shortcuts, and keyframe conversion techniques within After Effects, motion graphics professionals can ensure their projects achieve both visual brilliance and sonic precision.
Related posts: