Mastering White Balance Correction in Post-Production Using Adobe Premiere Pro Lumetri Color


Achieving accurate color balance remains one of the most persistent technical challenges in digital video production and post-production workflows. Even with advanced digital cinema cameras equipped with sophisticated sensors and preset white balance controls, footage frequently suffers from unexpected color casts. Among the most common and disruptive issues is an unwanted yellow or orange tint embedded in areas that should appear neutral white. When subjects, backgrounds, or key elements in a frame acquire this warm discoloration—often caused by mixed lighting temperatures, inaccurate in-camera calibrations, or sudden shifts in ambient light during a take—rectifying the problem in post-production can become exceptionally difficult. Traditional white balance adjustments, such as modifying temperature and tint sliders in editing suites, often fail to yield natural results because global corrections frequently skew skin tones and distort the broader color palette of the scene.
To address this recurring workflow hurdle, professional colorists and video editors are increasingly turning to targeted secondary color correction techniques. Utilizing the Hue vs. Saturation curve within Adobe Premiere Pro’s Lumetri Color panel offers a precise, non-destructive method for neutralizing unwanted yellow and orange color casts while preserving the integrity of surrounding hues. This technique bypasses the limitations of global white balance tools, allowing editors to surgically isolate and desaturate problematic warmth to produce cleaner, more accurate whites across diverse cinematic environments.

The Technical Mechanics of Color Casts and White Balance
In digital imaging, white balance is the process of global color correction designed to ensure that neutral colors—specifically white and gray—appear neutral under varying lighting conditions. Human vision automatically adapts to different light sources, such as the cool blue tones of overcast daylight or the warm yellow-orange output of tungsten incandescent bulbs. Digital camera sensors, however, record light objectively based on Kelvin temperature values. When a camera is miscalibrated or exposed to complex mixed-lighting environments, such as a daylight-balanced interior mixed with warm architectural lighting, the sensor captures these discrepancies as unwanted color dominants, predominantly in the yellow and orange spectrums.
Historically, editors attempted to correct these imbalances using primary color wheels and global temperature sliders. While effective in controlled laboratory settings, these tools alter the entire pixel array of a video frame. Lowering the color temperature globally to remove an orange cast often pushes midtones and shadows into unnatural, sickly cyan or blue tones, ruining flesh tones and degrading the overall cinematic aesthetic. Secondary color correction, which allows editors to target specific color ranges without affecting the rest of the image, has therefore emerged as the industry standard for fine-tuning complex footage. The Hue vs. Saturation curve represents one of the most powerful and accessible instruments for executing this targeted correction.
Step-by-Step Methodology for Removing Yellow Casts in Premiere Pro
Executing a precise yellow and orange reduction using Adobe Premiere Pro requires a methodical approach within the Lumetri Color ecosystem. The process relies on isolating specific vectors on the color wheel and selectively reducing their luminance and saturation values.

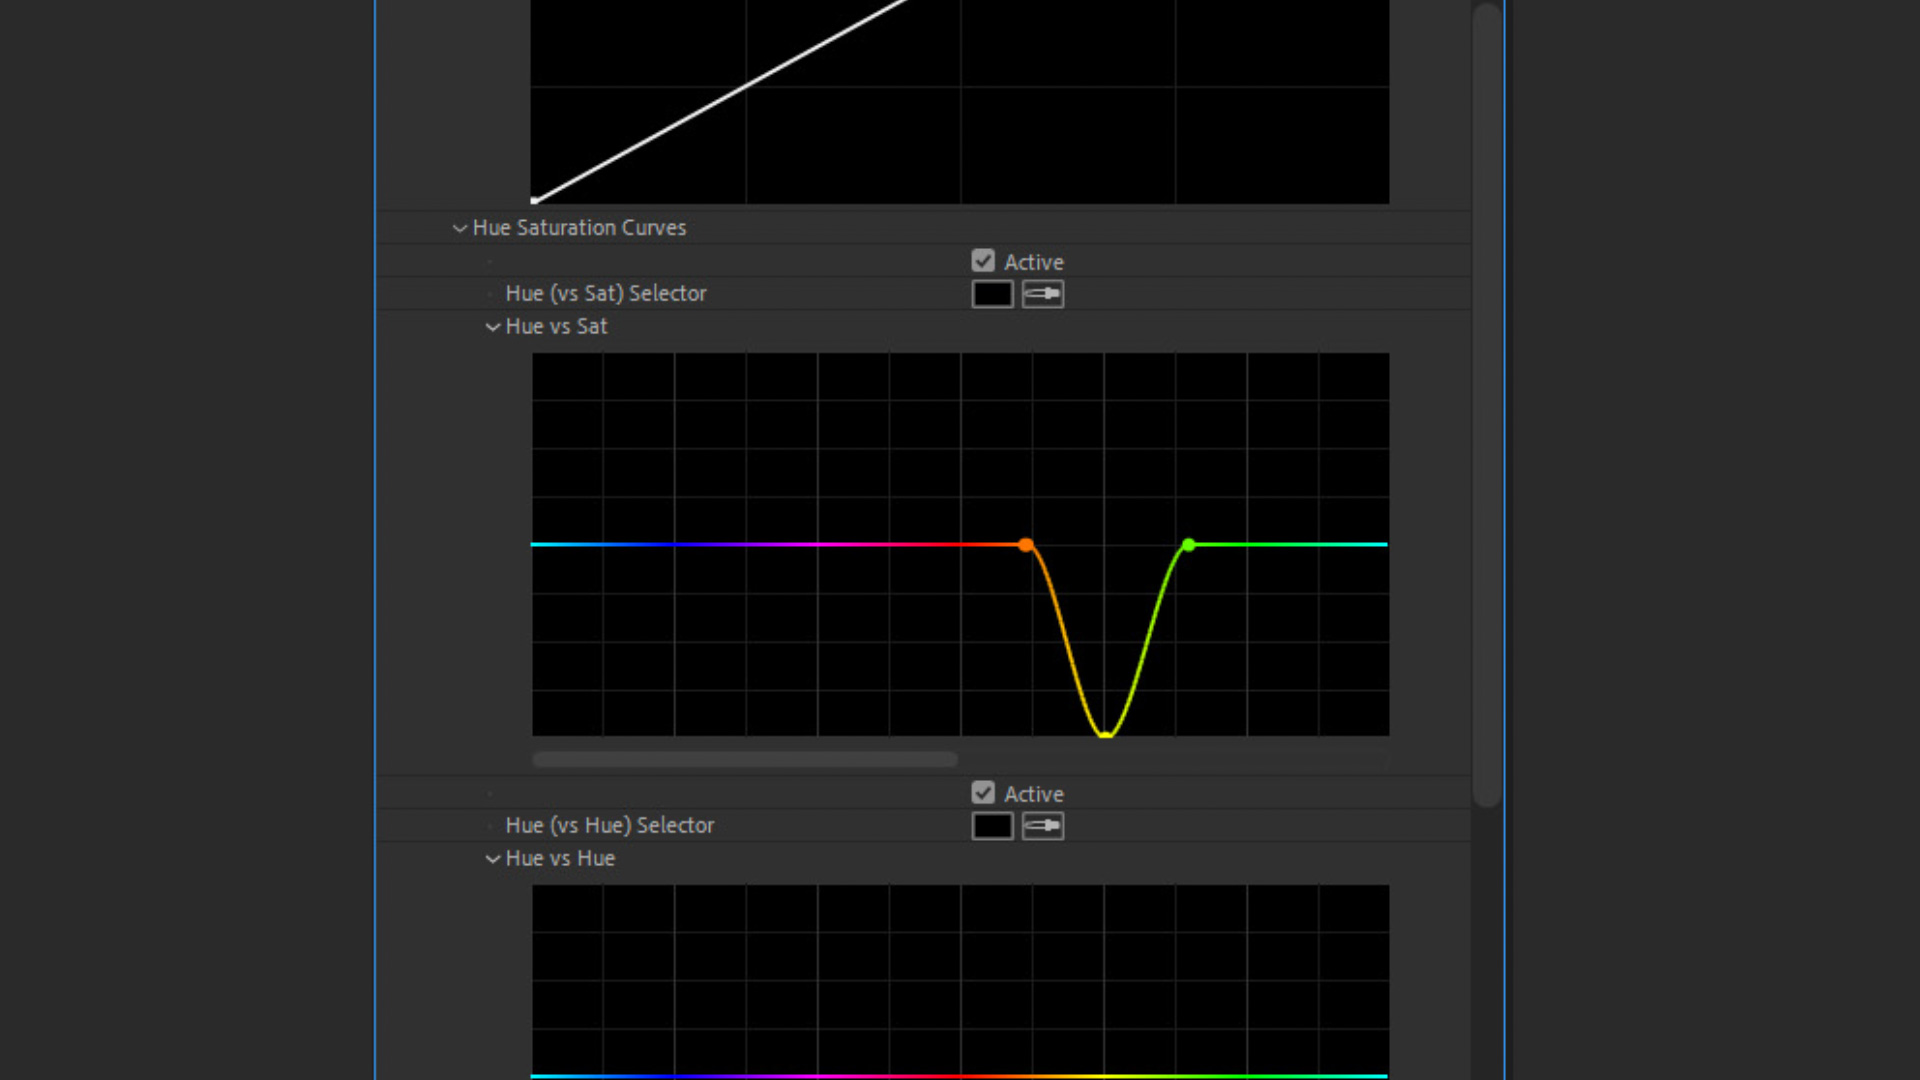
First, editors must apply the Lumetri Color effect to the target video clip from the Effects panel. Once applied, the editor navigates to the Curves section within the Lumetri panel parameters, specifically locating the Hue vs. Sat curve. Visually represented as a horizontal, rainbow-colored gradient line that maps color hues against saturation levels, this tool dictates how intense a specific color appears based on its chromatic value.
To isolate the problematic yellow or orange tint without altering adjacent colors like reds or greens, the editor must establish a precise confinement zone using control points. By clicking directly on the rainbow line, the user places three anchor points corresponding to the Orange, Yellow, and Green spectrums. These three points act as boundaries, ensuring that any adjustments made to the central point do not bleed into neighboring chromatic territories, thereby protecting skin tones (which often sit in the orange-yellow vector) and foliage (green).
Once the boundary points are secured, the editor drags the central yellow point downward on the graph. This vertical downward movement directly reduces the saturation of the targeted hue. Depending on the severity of the color cast, the point can be dragged halfway down for a subtle neutralization or all the way to the baseline for a complete elimination of the yellow hue. The result is an immediate suppression of the unwanted warmth, restoring neutral whites to surfaces such as clothing, architectural walls, paper, and specular highlights.
Practical Applications Across Diverse Production Scenarios
This targeted curve adjustment technique proves especially valuable in two distinct production scenarios: fixing localized color contamination in controlled shots and salvaging exterior or natural footage shot under overly warm lighting conditions.
In the first scenario—exemplified by product videography, tabletop shoots, or studio interviews—whites can easily become contaminated by ambient bounce light or improper gel usage on lighting fixtures. For instance, footage featuring a person pouring ingredients into a clear glass against a neutral background often exhibits muddy yellow reflections. Traditional primary color grading fails here because shifting the global white balance compromises the color of the ingredients or the natural warmth of the talent’s skin. By applying the three-point Hue vs. Sat curve adjustment, the editor successfully strips the distracting yellow tint from the white surfaces while leaving the rest of the visual composition intact and vibrant.
In the second scenario, the technique serves as an advanced alternative to traditional white balance correction for outdoor or documentary footage. Consider footage captured at sunrise or sunset featuring white subjects—such as white horses running along a coastline. While sunrise and sunset inherently produce warm, golden-hour light, overexposed or improperly metered digital sensors can exaggerate this warmth, driving the highlights into an aggressive, unnatural orange cast that obscures fine textural details in white fur, sand, or foam.

Attempting to fix this by cooling down the entire shot via primary white balance controls strips the scene of its desired cinematic golden-hour atmosphere, turning the ambient sunlight a sterile, uninviting blue. By instead utilizing the Lumetri Hue vs. Sat curve—placing the anchor points strategically across the Orange, Yellow, and Green zones and shifting the yellow/orange vector downward—editors can selectively neutralize the harsh, blinding orange tint on the white subjects while preserving the warm, atmospheric glow of the sunrise across the rest of the landscape. This delivers a sophisticated balance where the environmental lighting remains romantic and warm, yet the primary subjects maintain clean, distinct, and natural white tonalities.
Workflow Integration and Industry Implications
The reliance on advanced curve-based secondary color correction reflects a broader evolution in post-production workflows. As digital sensor resolutions scale upward to 4K, 6K, and 8K, colorists face higher scrutiny regarding artifacts, color banding, and unnatural color shifts introduced during grading. Automated white balance tools in editing software often rely on algorithmic assumptions that can miscalculate complex scenes, leading to hours of manual masking and keying.
By mastering the Hue vs. Saturation curve within Lumetri Color, video editors operating within Adobe Premiere Pro can bypass complex secondary keying workflows, saving valuable time during tight post-production deadlines. This method maintains high processing speeds, operates natively within the non-destructive editing timeline, and integrates seamlessly with lookup tables (LUTs) and other primary grading adjustments.

Ultimately, the ability to surgically remove unwanted chromatic aberrations from white surfaces empowers independent filmmakers, corporate videographers, and broadcast editors to rescue imperfect footage that might otherwise be deemed unusable. As digital video capture continues to expand across diverse, uncontrolled environments, proficiency in targeted secondary color correction will remain an indispensable skill for maintaining professional visual standards in modern media production.