Mastering Color Fidelity: A Targeted Approach to Eliminating Yellow Casts and Refining White Balance in Video Footage


The pursuit of impeccable visual fidelity in digital video production frequently encounters a common yet persistent challenge: the subtle but disruptive presence of unwanted color casts, particularly in neutral tones. White objects, intended to appear pure and clean, often exhibit a yellowish or orange tint. This phenomenon, typically a byproduct of an imperfect white balance setting during acquisition, can significantly detract from the professional appearance and natural aesthetic of footage. While global white balance adjustments in post-production are an option, they often prove insufficient, introducing unintended color shifts across the entire spectrum and failing to deliver a truly natural resolution. However, a precise and highly effective method exists within leading video editing software, notably Adobe Premiere Pro, that empowers editors to surgically address these color inaccuracies, resulting in remarkably cleaner whites and a more authentic overall image.
The core of this advanced color correction technique lies within Premiere Pro’s powerful Lumetri Color panel, specifically utilizing its sophisticated Hue vs Saturation (Hue vs Sat) curves. This targeted approach allows for the selective desaturation of problematic hues without globally altering the footage’s color profile, thereby preserving the integrity of other colors.
Understanding the Root Cause: White Balance and Color Casts
To fully appreciate the efficacy of this method, it’s crucial to understand the principles of white balance. White balance is the process of removing unrealistic color casts, so that objects which appear white in person are rendered white in your footage. Cameras achieve this by adjusting the color temperature, measured in Kelvin (K), to compensate for the varying spectral composition of different light sources. For instance, daylight is typically around 5500K, emitting a balanced spectrum, while incandescent bulbs are much warmer, around 2700K, producing a distinctly orange-yellow light. Fluorescent lights often have a greenish spike.

When a camera’s white balance setting doesn’t accurately match the ambient lighting conditions, the entire image can acquire a color cast. A common error, particularly in mixed lighting environments or when shooting under warmer light sources without proper compensation, is for neutral whites to lean towards yellow or orange. This subtle shift, while perhaps not immediately obvious to the untrained eye during capture, becomes glaringly apparent in post-production, especially when attempting to maintain a professional or realistic look. Traditional white balance tools, while essential for broad corrections, can struggle with fine-tuning specific hues without compromising others, leading to a "push-pull" effect where one problem is solved only to create another.
The Lumetri Color Panel: A Hub for Advanced Grading
Adobe Premiere Pro’s Lumetri Color panel has become an indispensable tool for video editors and colorists, offering a comprehensive suite of controls for color correction and grading. Introduced to Premiere Pro in 2015, the Lumetri Color panel brought a consolidated and intuitive interface for tasks that previously required multiple effects and adjustments. It integrates functionalities from Adobe’s dedicated grading software, SpeedGrade (which was later discontinued), providing a streamlined workflow for everything from basic exposure and contrast adjustments to complex creative grades. Within this robust panel, the Curves tab houses critical tools for granular color control, among which the Hue vs Sat curve stands out for its precision in addressing specific color casts.
The Targeted Solution: Harnessing the Hue vs Sat Curve
The Hue vs Saturation curve is a graphical representation where the horizontal axis (X-axis) represents the full spectrum of hues (colors), and the vertical axis (Y-axis) controls the saturation level of those hues. By manipulating points along this curve, an editor can increase or decrease the intensity (saturation) of specific color ranges.

To eliminate unwanted yellow or orange tints from footage, the process begins by applying the Lumetri Color effect to the problematic clip. Navigating to the Curves tab within the Lumetri Color controls reveals several curve options, with "Hue vs Sat" being the key for this particular fix. The Hue vs Sat curve initially appears as a straight, rainbow-colored line, signifying an unaltered saturation level across all hues.
The strategic application of this technique involves creating three distinct control points on this curve: one in the orange region, one in the yellow region, and one in the green region. These points act as anchors, isolating the yellow-orange spectrum that needs adjustment while protecting adjacent colors from unintended changes. For instance, placing a point on either side of the primary yellow point ensures that only the targeted yellow frequencies are affected when the central point is manipulated.
Once these three points are established, the critical step is to drag the central yellow point downwards on the curve. Moving this point downwards directly reduces the saturation of the yellow hues within the designated range. The extent of this downward adjustment—whether halfway or all the way to the bottom—depends entirely on the intensity of the original yellow cast and the desired outcome. The visual feedback in the program monitor allows for real-time assessment, enabling the editor to achieve the perfect balance. This selective desaturation effectively "cleans" the whites, removing the yellow bias without flattening the overall image or introducing new color imbalances. The result is footage with whites that appear genuinely neutral and a significantly improved perception of color accuracy.
Beyond Cleaner Whites: Correcting Problematic White Balance
The utility of the Hue vs Sat curve extends beyond merely cleaning up white areas; it also serves as an exceptionally powerful tool for correcting broader white balance issues, particularly when footage appears excessively warm due to an incorrect camera setting. While a global white balance adjustment might shift the entire color temperature, potentially making other colors appear unnatural or cool, the Hue vs Sat method offers a more finessed solution.
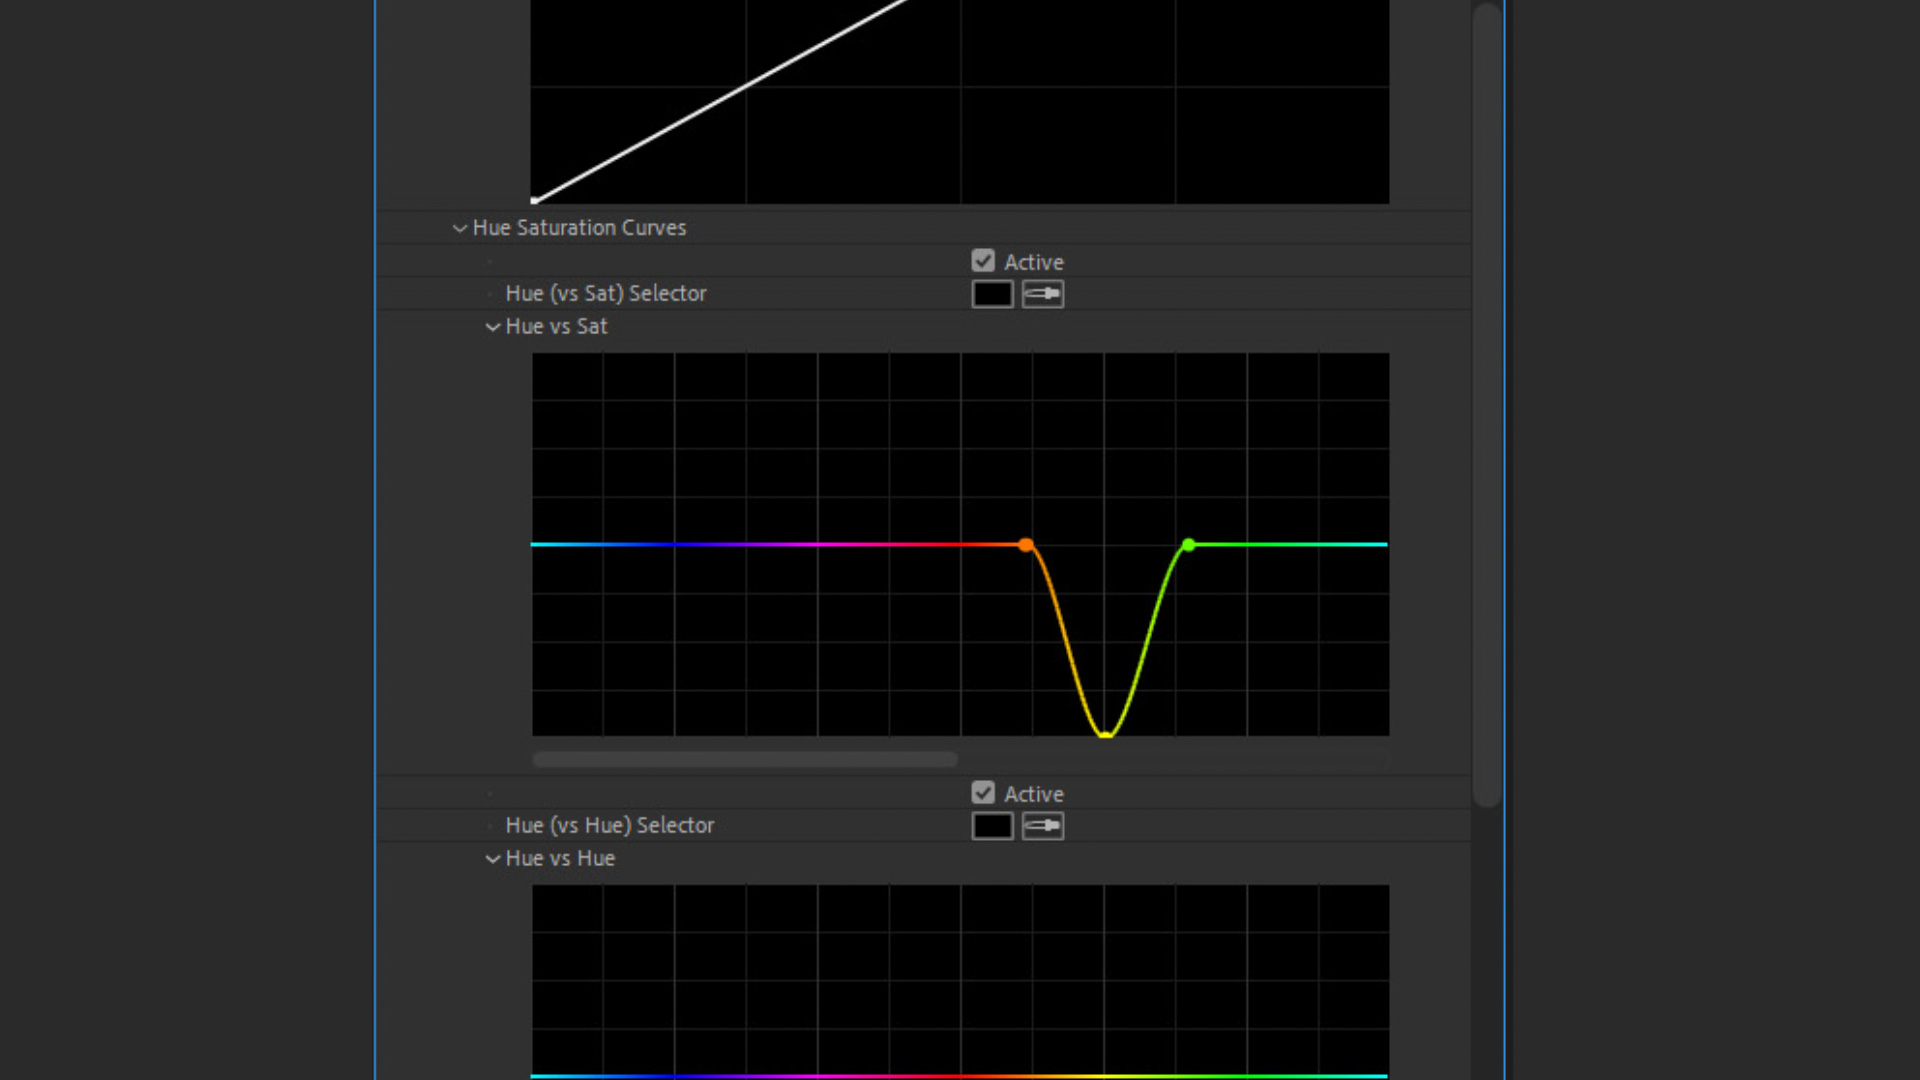
Consider footage captured under overly warm conditions, such as a sunrise scene where white objects, like horses on a beach, take on an orange-yellow cast. Applying the Lumetri Color effect and utilizing the Hue vs Sat curve in the same manner—creating points on the orange, yellow, and green segments—allows for the targeted reduction of these warm tones. For white balance correction, placing the primary yellow point slightly more towards the orange area of the curve can yield even better results, as an overly warm white balance often manifests with a strong orange component. By dragging this adjusted yellow/orange point downwards, the editor can subtly pull back the warmth, achieving a cleaner, more natural white balance without the harshness or unintended consequences of a broad temperature shift. The outcome is a significantly more balanced and visually pleasing image, with whites that are truly white and colors that appear accurate to the scene.
Chronology and Evolution of Digital Color Correction
The ability to perform such precise color corrections in video editing software represents decades of advancement in digital imaging and post-production. Early video editing systems offered rudimentary color controls, often limited to global adjustments of hue, saturation, and luminance. The advent of dedicated color grading systems in the late 20th and early 21st centuries, like DaVinci Systems (now Blackmagic Design DaVinci Resolve) and Apple’s Color (based on Silicon Color FinalTouch), introduced sophisticated curve-based controls and secondary color correction capabilities.
Adobe’s journey into comprehensive color grading within Premiere Pro saw significant milestones. Initially, users relied on a combination of built-in effects and third-party plugins. The introduction of the Lumetri Color panel marked a pivotal moment, consolidating these disparate tools into a unified, user-friendly interface that brought professional-grade color tools directly into the editing timeline. The inclusion of advanced curves like Hue vs Sat, alongside other powerful features like color wheels, creative LUT support, and HSL Secondary corrections, transformed Premiere Pro into a formidable tool for colorists, democratizing access to techniques previously reserved for high-end dedicated systems. This evolution reflects a broader industry trend towards integrated workflows and powerful, yet accessible, post-production tools.
Implications and Broader Impact

The meticulous correction of color casts and white balance issues carries significant implications for various sectors of content creation:
- Professionalism and Brand Image: For corporate videos, advertisements, and product showcases, accurate color representation is paramount. A yellow cast can make products appear aged, unhealthy, or simply unappealing. Correcting this ensures brand colors are true and the visual message is clear and professional.
- Narrative and Emotional Impact: In narrative filmmaking and documentaries, color plays a crucial role in setting mood and conveying emotion. Unintended color casts can disrupt the intended aesthetic, breaking immersion or sending the wrong visual cues. Precise color correction ensures the visual storytelling remains cohesive and impactful.
- Efficiency in Post-Production: While seemingly a minor adjustment, the ability to quickly and accurately fix color issues like yellow casts significantly enhances post-production workflow efficiency. Editors can spend less time wrestling with global adjustments and more time on creative grading, leading to faster turnaround times for projects.
- Accessibility and Consistency: Tools like Lumetri Color make advanced color correction techniques accessible to a wider range of creators, from independent filmmakers to digital content producers. This fosters greater consistency in visual quality across various platforms and productions.
- Viewer Experience: Ultimately, clean, accurate colors contribute to a superior viewer experience. Viewers may not consciously notice perfect white balance, but they will certainly register when colors feel "off" or unnatural, leading to a less engaging or even distracting viewing experience.
Expert Perspectives and Industry Best Practices
Industry professionals consistently emphasize the foundational importance of accurate color rendition. While capturing footage with optimal white balance at the source is always the ideal, real-world shooting conditions often make this challenging. As such, the consensus among colorists and post-production supervisors is that a robust and precise color correction toolkit is indispensable. Techniques like the Hue vs Sat curve in Lumetri Color are frequently cited as go-to methods for their surgical precision, allowing editors to address specific color problems without destabilizing the entire image.
"The Lumetri Color panel has become an absolute game-changer for many editors, bringing a level of control and flexibility that was once exclusive to high-end color suites," states a prominent freelance colorist, speaking on the condition of anonymity due to client confidentiality. "When dealing with stubborn color casts, especially in whites, global temperature adjustments can often be a blunt instrument. The Hue vs Sat curve, however, allows for a finesse that truly preserves the natural integrity of the image while eliminating those distracting yellow or orange biases. It’s about working with the colors, not just pushing them around."
Furthermore, the integration of these powerful tools into widely used NLEs like Premiere Pro underscores a broader industry trend towards empowering editors with comprehensive control over their final output. This not only streamlines workflows but also elevates the overall quality achievable even on modest budgets.

Conclusion: Precision as the Pillar of Visual Quality
The subtle presence of yellow or orange tints in footage, often a consequence of misjudged white balance, can significantly compromise the professional appeal and visual accuracy of any video project. While challenging to rectify with broad adjustments, the targeted application of the Lumetri Color panel’s Hue vs Saturation curve in Adobe Premiere Pro offers a highly effective and precise solution. By allowing for the selective desaturation of specific hues within the yellow-orange spectrum, this technique not only achieves cleaner, more natural-looking whites but also provides a powerful method for correcting overall warm white balance issues without introducing new color imbalances. This level of granular control is a testament to the continuous evolution of digital post-production tools, empowering content creators to achieve unparalleled color fidelity and deliver visually compelling narratives that resonate with audiences. As the demand for high-quality visual content continues to grow, mastering such precise color correction techniques remains a cornerstone of professional video production.
Related posts: