Mastering Video Color Correction: How to Neutralize Unwanted Yellow and Orange Tints in Post-Production


Achieving accurate color balance is one of the most persistent challenges in professional video production and post-production workflows. Even with meticulous planning, calibrated monitors, and advanced in-camera settings during principal photography, lighting inconsistencies and environmental factors frequently introduce unwanted yellow or orange color casts into recorded footage. When these casts affect neutral surfaces—particularly pure whites—correcting them conventionally through standard white balance adjustments can compromise skin tones, distort background environments, and yield an unnatural aesthetic.
Industry professionals constantly seek refined, non-destructive methodologies to isolate and neutralize these persistent color imbalances without sacrificing the overall fidelity of the shot. Through strategic manipulation of secondary color-correction tools, specifically within color-grading suites such as Adobe Premiere Pro’s Lumetri Color panel, editors can achieve immaculate, crisp whites. This technique bypasses the limitations of global temperature and tint sliders, offering precise control over localized color saturation.
The Mechanics of Color Casts and White Balance Challenges
To understand the necessity of targeted secondary color correction, one must examine how digital sensors capture light and how color temperatures manifest in video files. Color temperature is measured in Kelvin (K), ranging from warm (low Kelvin, amber/yellow/orange tones) to cool (high Kelvin, blue tones). During shooting, a mismatch between the camera’s white balance setting and the actual lighting environment—such as daylight-balanced sensors under tungsten indoor lighting, or overly warm golden hour illumination—introduces a dominant color cast.

While primary color correction tools allow operators to shift the overall color temperature of a scene, these global adjustments affect every pixel in the frame proportionally. Consequently, attempting to cool down an overly warm image by dragging the temperature slider toward the blue spectrum often leaves midtones looking muddy, shadows unnaturally cyan, and human skin tones drained of their natural warmth.
Post-production supervisors and online editors frequently encounter scenarios where white objects, apparel, or architectural elements pick up ambient reflections that register as a muddy yellow or orange hue. Traditional color correction workflows struggle to isolate these specific tones without altering adjacent colors. Advanced secondary grading methods, however, allow colorists to target specific hues on the color spectrum, reducing their saturation independently while leaving the broader color palette intact.
Step-by-Step Workflow: Neutralizing Yellow Casts via Lumetri Color
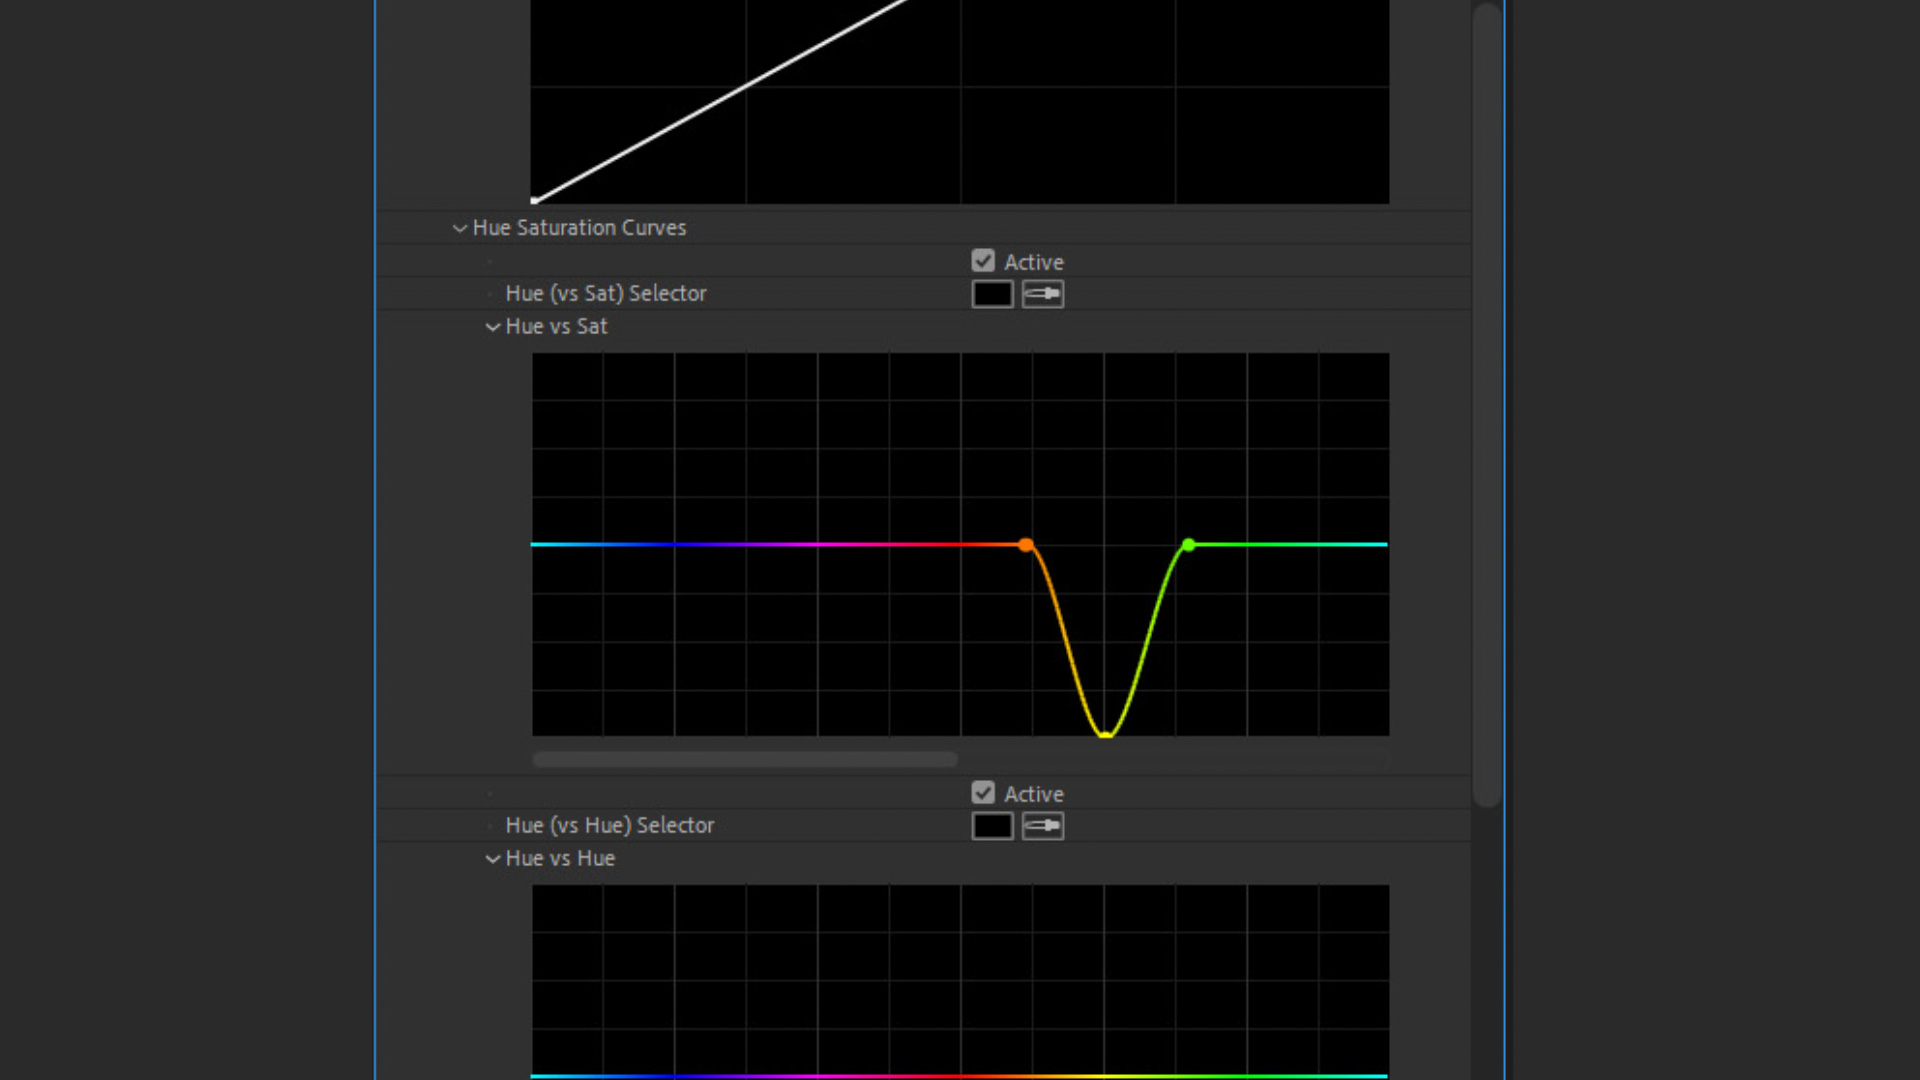
Executing this precise correction requires leveraging the Hue vs Saturation curve within Adobe Premiere Pro’s Lumetri Color effect. This specific curve maps the entire color spectrum—represented as a linear gradient—against a saturation axis, allowing editors to selectively attenuate or boost specific color families based on their hue angle.
The technical workflow proceeds through a structured sequence designed to minimize collateral alterations to neighboring hues:

-
Application of the Color Effect: Apply the Lumetri Color effect to the target video clip on the timeline. Navigate directly to the Curves section within the effect controls panel and locate the Hue vs Sat sub-tab. The interface presents a horizontal, rainbow-colored gradient line that represents the full 360-degree color wheel, coupled with a vertical axis determining saturation levels.
-
Establishing Anchor Points: To isolate the unwanted yellow tint without disrupting adjacent green foliage or red/orange skin tones, the editor must establish a boundary using control points. Click on the gradient line to anchor three distinct points: one in the Orange region, one in the Yellow region, and one in the Green region. These anchor points act as mathematical boundaries, ensuring that any adjustments made between the outer orange and green pins remain strictly localized to the targeted yellow spectrum.
-
Attenuating Saturation: With the boundaries secured, click directly on the central yellow anchor point and drag it downward along the vertical saturation axis. Depending on the severity of the color cast, the point can be pulled halfway down for a subtle reduction or all the way to the bottom baseline to completely strip out the yellow saturation.
-
Fine-Tuning the Isolation: Preview the playback to evaluate the transition between the adjusted yellow spectrum and the preserved orange and green regions. If necessary, adjust the placement of the orange and green anchor points horizontally to widen or narrow the isolation range, preventing banding or abrupt color transitions.
The immediate visual result is the elimination of the distracting yellow tint from white surfaces, rendering them crisp and neutral, while preserving the natural warmth of flesh tones and surrounding elements.
Addressing Warm White Balance and Sunset Lighting Anomalies
Beyond accidental color contamination, this technique proves exceptionally valuable when correcting intentionally warm footage—such as outdoor scenes captured during sunrise or sunset—that suffers from an excessive orange color bias. While golden hour lighting is aesthetically pleasing in many contexts, certain subjects, such as white animals, bridal wear, or clinical environments, require visual neutrality that standard white balance controls fail to deliver.
When processing footage with an overly aggressive warm color balance, the standard Lumetri temperature and tint adjustments often fail because the orange cast is deeply embedded in the luminance values of the highlights. By deploying the Hue vs Sat curve technique with a slight procedural modification, editors can achieve superior results.
Instead of anchoring exclusively on the standard yellow boundary, the editor should position the primary adjustment point slightly deeper into the orange spectrum. By dragging this orange-yellow hybrid point downward, the heavy amber cast that blankets the highlights and midtones is systematically reduced. This method retains the atmospheric ambiance of the sunset or sunrise while stripping away the color distortion that obscures fine details in white or neutral objects.

Industry Implications and Post-Production Efficiency
The adoption of targeted curve-based adjustments reflects a broader evolution in digital non-linear editing (NLE) software. As cameras capture higher dynamic ranges and wider color gamuts—such as Log-profiled footage recorded in 10-bit or 12-bit color depths—the demand for granular, non-destructive post-production tools has intensified.
Colorists and editors operating within tight commercial deadlines benefit significantly from workflows that avoid round-tripping to dedicated grading suites like DaVinci Resolve for minor corrective tasks. By mastering native NLE tools such as Premiere Pro’s Lumetri curves, production houses can streamline their editing pipelines, reduce render times, and maintain consistent quality control across multi-camera projects.
Furthermore, minimizing color correction errors upstream reduces the cognitive load on client review cycles. When white balance anomalies are resolved cleanly and invisibly, client feedback regarding unnatural skin tones or discolored wardrobe items diminishes significantly, leading to faster project sign-offs and elevated production values across independent films, corporate videos, and broadcast commercials.
Related posts: