Mastering Professional Camera Handling Techniques for Sharp Handheld Photography

In the high-stakes world of professional photography, where the margin between a crisp masterpiece and a discarded, blurry image is often measured in millimeters of movement, the mastery of physical stabilization is an essential skill. While modern camera systems have introduced increasingly sophisticated In-Body Image Stabilization (IBIS) and optical lens stabilization, these technologies are intended to supplement, not replace, the fundamental principles of human body mechanics. When shooting at slow shutter speeds, utilizing telephoto lenses, or capturing images at wide apertures where the depth of field is razor-thin, the photographer’s posture serves as the primary defense against kinetic blur. Professional photographers and educators consistently emphasize that no amount of post-processing software can fully rectify the lack of foundational stability during the exposure process.

The Evolution of Stabilization Standards
Historically, the industry standard for determining a safe shutter speed has been the "reciprocal rule." This guideline dictates that to achieve a sharp, handheld image, the shutter speed denominator should be equal to or greater than the focal length of the lens (e.g., a 200mm lens requires a minimum shutter speed of 1/200th of a second). However, this rule assumes a standard of stability that many amateurs fail to meet. Empirical data from professional photography workshops suggests that when a photographer adopts specific bracing techniques—effectively turning their skeletal structure into a human tripod—they can consistently capture sharp images at two to four stops below the reciprocal rule threshold. This capability is critical for photojournalists, event photographers, and natural light shooters who must operate in challenging, low-light environments without the luxury of bulky support equipment.

Core Techniques for Maximum Stability
The primary objective of all professional holding techniques is to maximize the number of contact points between the photographer’s body and the camera, while simultaneously grounding those points against immovable surfaces.

Tucking the elbows into the torso remains the most effective, yet frequently ignored, technique for standing photography. When a shooter allows their elbows to flare outward, the arms become "free-floating" levers, susceptible to every micro-vibration of the torso. By pulling the elbows firmly against the ribcage, the camera is anchored to the body’s center of gravity. Furthermore, the left hand must be positioned under the lens barrel rather than gripping the side; this provides a mechanical shelf that supports the weight of the glass, preventing the "nose-heavy" dip that causes strain and vibration.
In scenarios where natural light is insufficient, bracing against fixed infrastructure is the next logical step. Whether leaning a shoulder against a structural pillar, pressing an elbow into a doorframe, or stabilizing against a wall, the goal is to decouple the camera from the involuntary sway of the human frame. Studies in human biomechanics note that even when standing perfectly still, the human body exhibits continuous, subtle oscillations due to respiration and cardiac rhythm. Bracing against a rigid, immobile object effectively bypasses these biological movements.

Advanced Stabilization: The Elbow Shelf and Squatting Mechanics
When the environment provides no external surfaces for support, photographers often employ the "elbow shelf" technique. By bringing the left arm across the chest and firmly gripping the right shoulder, the left forearm becomes a stable platform for the camera to rest upon. This method is particularly useful during long-duration shoots, as it mitigates muscle fatigue in the wrists and shoulders, which is a leading contributor to late-day camera shake.

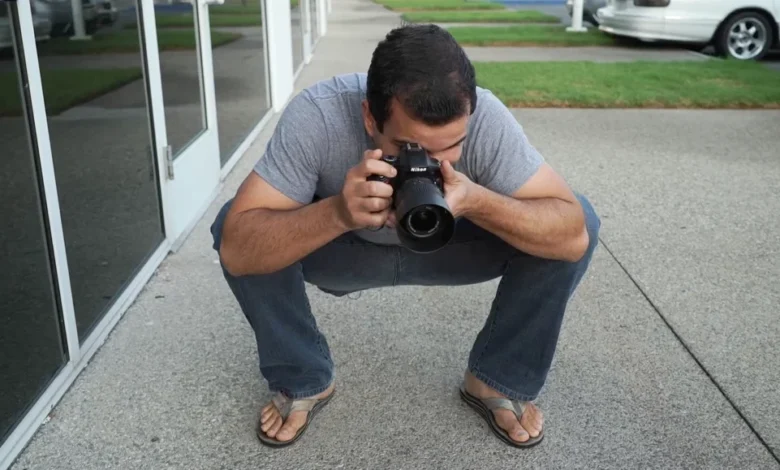
For low-angle compositions, the "super squat" is the preferred methodology among seasoned professionals. The common error involves crouching on the balls of the feet, which creates a highly unstable, elevated pivot point. The correct approach requires a flat-footed stance, with the feet planted firmly on the ground. By resting the elbows directly onto or inside the knees, the photographer creates a closed-loop system of stability. This configuration offers a degree of steadiness that rivals the performance of a monopod.
The Biological Factor: Regulating Respiratory Cycles

A frequently overlooked variable in image sharpness is the respiratory cycle. Many novice photographers instinctively hold their breath to achieve a "still" moment, but clinical observations indicate that this creates unnecessary physiological tension. As the body is deprived of oxygen, muscles begin to experience subtle tremors, which are then transmitted directly to the shutter button.
The professional standard is to utilize the natural pause that occurs at the bottom of a controlled exhale. By firing the shutter at this exact moment—when the diaphragm is relaxed and the chest is at its most stable—the photographer minimizes the risk of movement. Consistent practice of this rhythm allows for the capture of sharp frames at shutter speeds that would otherwise be impossible to sustain handheld.

Implications for Equipment and Workflow
The integration of these techniques has profound implications for a photographer’s workflow. Relying solely on optical stabilization can lead to complacency, where the photographer fails to account for the limitations of the technology. Modern stabilization systems generally reach a point of diminishing returns at very low shutter speeds; for instance, at speeds slower than 1/10th of a second, even the best IBIS systems may struggle to compensate for significant body sway.

Furthermore, the choice of camera accessories can impact results. Neck straps, if left to swing, can act as a pendulum, introducing rhythmic vibrations into the camera system. Many professionals prefer to wrap the strap around their wrist or remove it entirely when working in environments where maximum stability is required. In portrait orientation, the use of a battery grip is often recommended, as it allows for a shutter button position that keeps the hands in a natural, tucked-elbow configuration, preserving the same ergonomic advantages found in landscape shooting.
Analysis of Impact

The transition from "accidental" sharpness to consistent, technique-driven clarity is a defining characteristic of a professional. Data gathered from industry-standard photography curricula demonstrate that shooters who adopt these six core techniques see a measurable increase in their "keeper rate"—the percentage of images that meet professional standards for sharpness—within a single shooting session.
While equipment technology continues to advance, the photographer’s body remains the most significant component of the imaging chain. By mastering the physical aspects of the craft, photographers gain the creative freedom to explore wider apertures and slower shutter speeds, regardless of the lighting conditions. This foundational knowledge serves as a safeguard, ensuring that the artistic vision of the photographer is not compromised by the physical limitations of the medium.

As the industry moves toward higher-resolution sensors, the demand for physical precision is only increasing. High-megapixel sensors are inherently less forgiving of micro-movements, meaning that the techniques used to hold a camera have become even more critical in the modern digital era. By viewing the body as a support system, the photographer ensures that the camera remains a static, precise instrument, capable of delivering the highest level of optical fidelity in any environment. Whether working in a controlled studio or a dynamic, fast-paced field setting, the application of these physical stabilization techniques is the hallmark of technical proficiency in contemporary photography.
Related posts: