
The presented technique offers a precise and effective solution, focusing on selective desaturation of specific hue ranges. This allows videographers, editors, and colorists to achieve cleaner-looking whites and a more accurate overall color representation, ultimately enhancing the professional quality of their visual narratives. The core of this process lies within the Lumetri Color panel’s Curves tab, specifically utilizing the Hue vs Saturation curve, a powerful tool for granular control over color fidelity.
The Pervasive Challenge of Color Casts in Video Production
In the demanding world of video production, color accuracy is not merely an aesthetic preference; it is a fundamental requirement for conveying realism, establishing mood, and maintaining brand consistency. White, in particular, serves as a crucial reference point for the human eye, anchoring the perception of all other colors in a scene. When whites appear tinted with yellow or orange, it can immediately signal an unprofessional or poorly calibrated image, detracting from the viewer’s experience. This issue is often exacerbated by challenging shooting conditions, such as mixed lighting environments (e.g., warm tungsten lights combined with cooler daylight), older fluorescent fixtures that emit a green-magenta spike, or simply an oversight in setting the camera’s white balance temperature and tint during production.
Traditionally, addressing such color anomalies in post-production involved a delicate balance of adjustments. Global white balance corrections (temperature and tint sliders) often impact the entire image, potentially "fixing" the whites at the expense of introducing new color problems elsewhere, such as cooling down skin tones too much or desaturating natural greens. This necessitates a more surgical approach, one that can isolate and manipulate specific color ranges without affecting others. The evolution of digital non-linear editing (NLE) software, particularly with advanced color grading suites like Lumetri Color in Adobe Premiere Pro, has provided editors with the sophisticated tools needed for such precise interventions.

Evolution of Color Correction and Lumetri Color’s Role
The journey of color correction in filmmaking has progressed from rudimentary photochemical processes in the analog era to highly sophisticated digital workflows. Early digital tools offered basic adjustments for contrast, brightness, and global color balance. However, the demand for finer control grew exponentially with the advent of digital cinema cameras and high-definition content. Adobe’s integration of the Lumetri Color panel into Premiere Pro marked a significant leap forward, democratizing professional-grade color grading for a wider audience.
Launched as a dedicated color workspace, Lumetri Color consolidated various color tools into a single, intuitive panel, drawing inspiration from high-end color grading systems like DaVinci Resolve. It features a hierarchical structure, beginning with basic corrections (exposure, contrast, highlights, shadows, whites, blacks, temperature, tint), moving to creative looks (LUTs, vibrance, saturation), and then to more advanced controls like Curves, Color Wheels & Match, HSL Secondary, and Vignette. This comprehensive suite allows editors to perform everything from quick stylistic grades to intricate color isolation and correction tasks. The non-destructive nature of Lumetri Color, applied as an effect, ensures that original footage remains untouched, offering flexibility for iterative adjustments and revisions. Its introduction significantly streamlined workflows, allowing editors to perform complex color grading directly within their editing timeline, eliminating the need to roundtrip footage to external applications for most color tasks.
Implementing the Hue vs Saturation Curve Technique for Cleaner Whites
The specific methodology for eradicating yellow and orange color casts leverages the granular control offered by the Lumetri Color panel’s Curves tab. This process is highly targeted and yields results that often appear more natural than broad white balance adjustments.

Step-by-Step Breakdown:
-
Applying the Lumetri Color Effect: The first action in this corrective workflow is to apply the Lumetri Color effect to the problematic footage clip within the Premiere Pro timeline. This is typically done by dragging the "Lumetri Color" effect from the Effects panel onto the desired video clip. Applying it as an effect ensures a non-destructive editing process, allowing for easy adjustments, disabling, or removal without altering the source media. For a more flexible and non-linear workflow, professional colorists often apply Lumetri Color to an Adjustment Layer placed above multiple clips, allowing a single set of color corrections to affect an entire sequence.
-
Navigating to the Curves Tab: Once the Lumetri Color effect is applied, select the clip (or adjustment layer) in the timeline and open the Lumetri Color panel (usually found in the Color workspace). Within this panel, locate and expand the "Curves" tab. The Curves section provides powerful graphical interfaces for manipulating color and luminosity. Unlike the basic sliders, curves allow for highly specific adjustments to tonal ranges and color channels.
-
Selecting the Hue vs Sat Curve: Inside the Curves tab, several curve options are available, each serving a distinct purpose. For this particular correction, the "Hue vs Sat" curve (also known as Color Hue vs Saturation) is the critical tool. This curve is represented by a rainbow-colored line, where the horizontal axis represents the spectrum of hues (colors) and the vertical axis controls their saturation levels. By manipulating this curve, one can selectively increase or decrease the saturation of specific colors without significantly impacting their luminosity or hue. This makes it ideal for isolating and desaturating unwanted color casts.
-
Creating Strategic Control Points: To precisely target the yellow and orange hues, three control points must be strategically placed on the Hue vs Sat curve. These points act as anchors, defining the range of colors that will be affected and protecting adjacent colors from unintended changes.
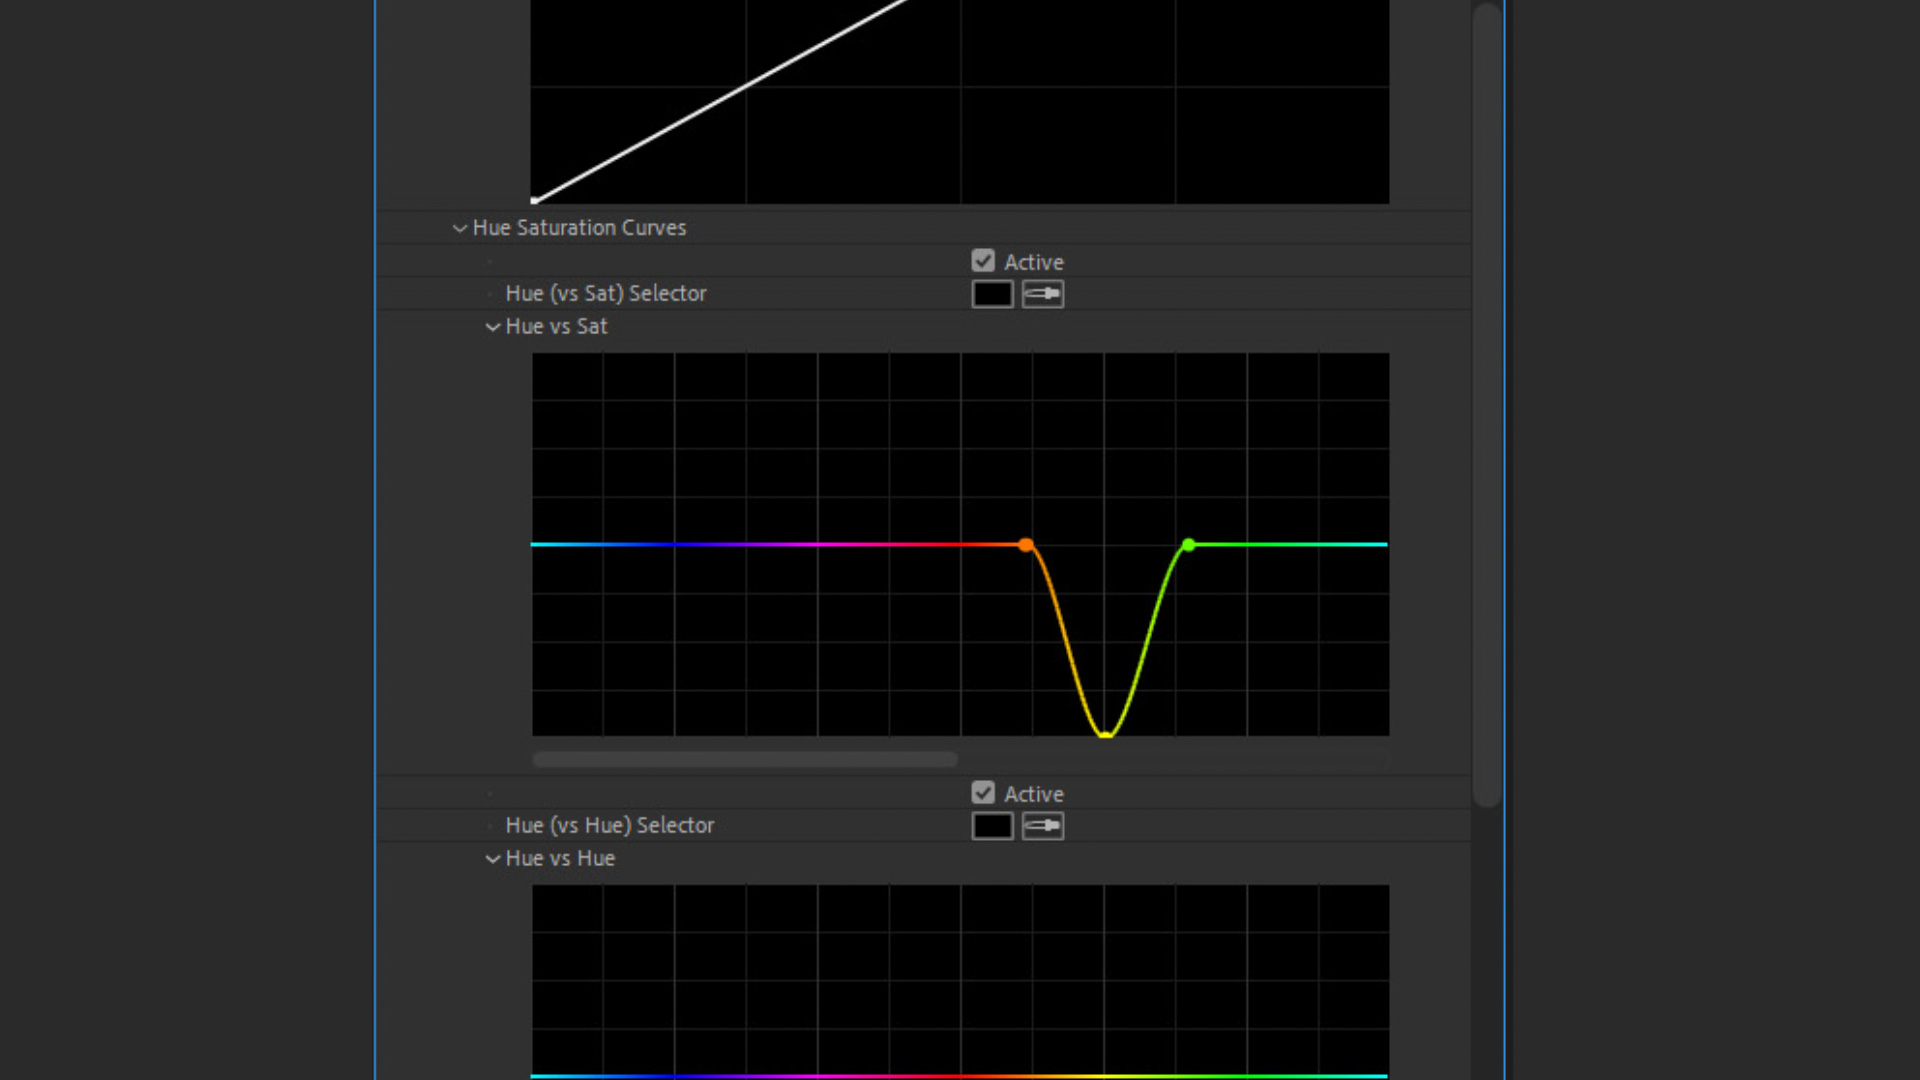
- Orange Point: Place the first point in the orange section of the curve. This point helps define the left boundary of the yellow-orange range that will be desaturated.
- Yellow Point: Place the second, central point directly on the yellow section of the curve. This is the primary control point that will be manipulated.
- Green Point: Place the third point in the green section of the curve. This point establishes the right boundary, ensuring that the desaturation primarily affects yellows and oranges without encroaching too heavily into the greens.
The precise placement of these points is crucial. They should be positioned to "feather" the adjustment, meaning the effect gradually increases towards the central yellow point and gradually diminishes towards the outer orange and green points, creating a smooth transition rather than an abrupt color break.
-
Adjusting the Yellow Control Point: With the three control points established, the final and most impactful step is to click and drag the central yellow point downwards on the curve. Moving this point downwards reduces the saturation of all hues within the defined yellow-orange-green range, with the most significant impact on the yellow hues. The extent to which the point is dragged depends entirely on the severity of the yellow cast and the desired outcome. For subtle corrections, a slight downward adjustment may suffice. For prominent yellow tints, moving the point halfway or even all the way down may be necessary. It is an iterative process that requires visual assessment, preferably with the aid of scopes, to ensure a natural and pleasing result.
The immediate visual impact of this adjustment is a noticeable reduction in the yellow and orange tint, particularly evident in areas that should appear white or neutral grey. This results in whites that are genuinely cleaner, crisper, and more neutral, thereby improving the overall color balance and professional appearance of the footage. The example of a person pouring sugar into a glass of water, initially plagued by a yellow/orange cast, demonstrates a stark improvement, with the whites of the sugar and glass appearing much purer post-correction.
Addressing Problematic White Balance Issues Beyond Simple Color Casts
Beyond merely cleaning whites, this Hue vs Sat curve technique proves exceptionally effective in correcting broader white balance inaccuracies that manifest as an overly warm or cool overall image. Traditional white balance adjustments often rely on temperature (blue-orange axis) and tint (green-magenta axis) sliders. While effective for general corrections, they can be blunt instruments when a specific color, like yellow or orange, is causing a disproportionate problem, especially when that color is integral to the scene (e.g., a sunset).
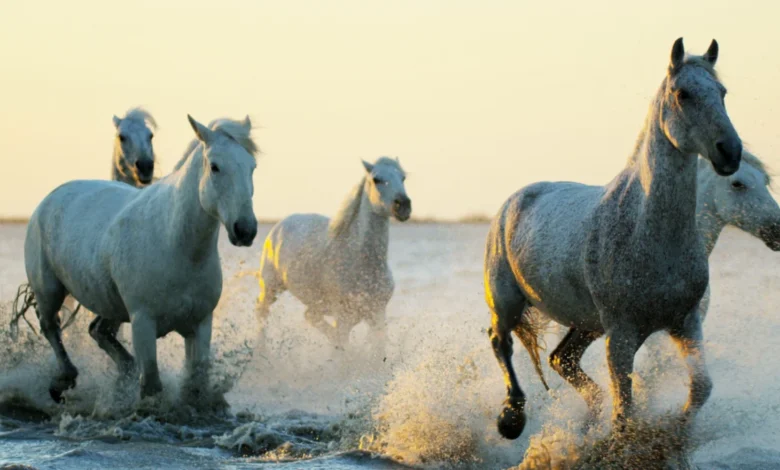
Consider footage shot with an overly warm white balance, resulting in an orange color cast across the entire image, such as white horses running on a beach at sunrise. Applying a global white balance correction to cool down the image might inadvertently make the sky or shadows too blue, or desaturate desirable warm tones from the sunrise itself. In such scenarios, the targeted desaturation of yellows and oranges through the Hue vs Sat curve provides a superior solution.

The process remains largely the same: applying Lumetri Color, navigating to the Hue vs Sat curve, and setting the orange, yellow, and green control points. However, for a broader white balance correction that leans towards excessive warmth, placing the yellow point slightly more towards the orange area of the curve can yield better results, allowing for a wider sweep of the problematic warm hues. By dragging this adjusted yellow point downwards, the dominant warm cast is precisely attenuated, leaving behind a more balanced and natural-looking image. The whites on the horses, for instance, would regain their intended neutrality without stripping the scene of its natural sunrise warmth. This method offers a nuanced approach, preserving the intended mood of the shot while rectifying color inaccuracies.
Supporting Data and Expert Best Practices
The importance of precise color correction is underscored by industry standards across various media. In broadcast television, strict colorimetry guidelines (e.g., Rec. 709 for HDTV, Rec. 2020 for UHD) dictate acceptable color ranges to ensure consistent viewing experiences across different display devices. For corporate videos and e-commerce, accurate product representation is paramount; a yellow tint on a white product could mislead consumers. Filmmakers meticulously grade their footage to evoke specific emotions and maintain visual continuity, making tools like Lumetri Color indispensable.
Colorists frequently advocate for a multi-faceted approach to color grading. While the Lumetri Color’s eyedropper white balance tool can provide a quick starting point, it often falls short when dealing with complex or mixed lighting situations. This is where manual curve adjustments, particularly the Hue vs Sat curve, demonstrate their superior precision. For instance, an industry study on color perception revealed that even subtle shifts in white point color temperature can significantly alter a viewer’s emotional response to an image, highlighting the psychological impact of accurate color.
For optimal results, professionals recommend integrating this technique with other best practices:

- Monitoring with Scopes: Always use waveform, vectorscope, and histogram monitors in Premiere Pro (or external hardware scopes) to objectively assess color shifts. The vectorscope, in particular, helps visualize color saturation and hue distribution, making it easier to see the impact of curve adjustments.
- Adjustment Layers: Employing adjustment layers for color corrections maintains a non-destructive workflow and allows for global changes across multiple clips, simplifying management and revisions.
- Subtle Iterations: Color correction is an art of subtlety. Make small, iterative adjustments and constantly compare before and after states to avoid over-processing the image, which can lead to an artificial or "digital" look.
Broader Impact and Implications for Video Production
The widespread adoption and understanding of techniques like selective Hue vs Saturation adjustment within Lumetri Color have several significant implications for the video production industry:
- Enhanced Quality Control: This method empowers creators to achieve higher standards of visual quality, ensuring that their footage meets professional expectations for color accuracy and fidelity. This directly translates to more polished, engaging, and credible content.
- Streamlined Workflows: By offering a precise solution within Premiere Pro, editors can resolve a common and frustrating color issue more efficiently. This reduces the time spent on corrective grading, freeing up resources for creative enhancements or other post-production tasks.
- Democratization of Professional Tools: The accessibility of powerful tools like Lumetri Color, coupled with straightforward tutorials on advanced techniques, democratizes professional-grade color correction. It allows independent filmmakers, YouTubers, and small production houses to achieve results previously only attainable with specialized software and dedicated colorists.
- Greater Creative Freedom: A solid foundation of accurate color correction provides a clean canvas for creative color grading. By first neutralizing unwanted casts, colorists can then apply stylistic looks and moods with greater confidence, knowing their creative choices are built upon a technically sound base.
- Adaptability to Diverse Shooting Conditions: This technique equips editors with a reliable method to compensate for less-than-ideal shooting conditions, such as challenging lighting or situations where a perfect white balance cannot be achieved in-camera. This adaptability is crucial in fast-paced production environments.
In conclusion, the ability to meticulously control and correct color, particularly the nuanced problem of yellow and orange casts affecting white balance, represents a critical skill in modern video post-production. The Lumetri Color panel’s Hue vs Saturation curve in Adobe Premiere Pro offers an elegant, powerful, and accessible solution that elevates the visual quality of video content across all genres and platforms. As video production continues to evolve, the demand for precise and natural-looking color will only grow, cementing the importance of such targeted correction techniques.


