How to Recreate Authentic Mini DV and Lo-Fi Aesthetic Effects in After Effects


The relentless cycle of digital nostalgia has officially propelled the video production industry past the worn-out textures of VHS tapes and deep into the distinct aesthetic of the early 2000s: Mini DV. As modern creators increasingly lean toward Lo-Fi, hyper-nostalgic visuals for music videos, indie films, and commercial campaigns, the demand for authentic-looking digital tape degradation has surged. Originally introduced by Panasonic, Sony, and other electronics giants in the mid-1990s, Mini DV formats defined an entire era of home videos, early independent cinema, and broadcast television before giving way to high-definition digital sensors. Today, filmmakers are actively seeking ways to replicate the unique technical limitations of those vintage camcorders—including aggressive pixelation, high-contrast imagery, and distinct color artifacts. To meet this creative demand, professional post-production workflows have adapted, offering digital artists straightforward pathways to simulate authentic tape textures inside software suites like Adobe After Effects.
Understanding the Mini DV and Lo-Fi Aesthetic Phenomenon
To accurately recreate the look of Mini DV footage, editors must first understand the engineering behind the medium. Unlike the analog magnetic degradation associated with VHS, Mini DV was a digital format that recorded compressed video onto small magnetic tape cassettes. However, by modern 4K and 1080p standards, standard-definition Mini DV resolution was exceptionally low, typically capturing footage at 720×480 pixels in North America (NTSC) or 720×576 pixels in Europe (PAL) with a strict 4:3 aspect ratio.

When this low-resolution, heavily compressed data is scaled up to fit contemporary high-definition or ultra-high-definition displays, distinct digital artifacts occur. These include heavy aliasing, jagged diagonal edges, color bleeding, and pixel grid distortion. Far from being technical flaws to be corrected, these historical limitations are now viewed by contemporary cinematographers as artistic assets that impart warmth, imperfection, and a tangible sense of memory to pristine modern digital recordings. Industry data from creative asset marketplaces indicates a multi-year surge in searches for retro video overlays, presets, and emulation tutorials, signaling a profound cultural shift away from clinical sharpness in favor of tactile, organic imperfections.
Step-by-Step Production Guide: Building the Mini DV Comp in After Effects
Recreating these vintage characteristics requires a deliberate, multi-layered compositing approach within Adobe After Effects. Rather than applying a single filter to a modern timeline, artists must manipulate resolution constraints, scaling properties, and color channels to mirror the physical capture pipeline of a legacy camcorder.
The process begins by establishing a dedicated lower-resolution workspace. Editors must create a new composition titled Mini DV Comp and set the dimensions to 200 pixels by 150 pixels. This specific bounding box preserves the classic 4:3 aspect ratio native to early digital tape formats. Once the master clip is imported into this nested composition, it will inevitably appear oversized. To correct this automatically without distorting the frame, creators should select the footage layer and navigate to Layer, then Transform, and finally choose Fit to Comp Height.
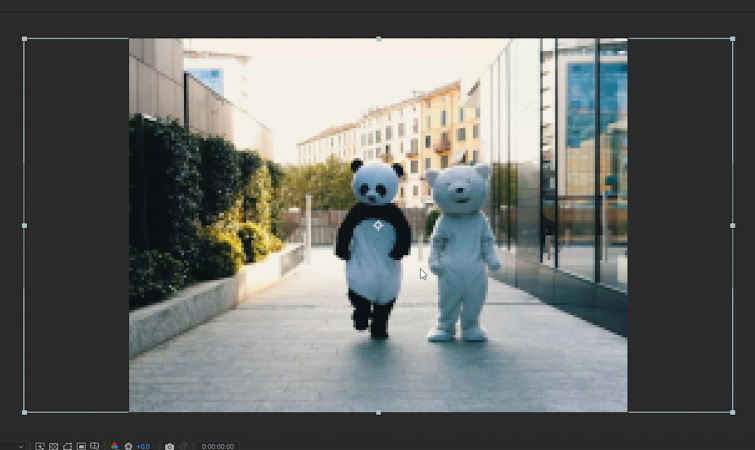
At this stage, the preview window will display an intensely pixelated image. While alarming at first glance, this extreme loss of fidelity is a necessary foundational step. This low-resolution asset must then be brought into a second, primary workspace known as the Main Comp, which is configured to modern full-HD specifications at 1920 pixels by 1080 pixels.
Placing the Mini DV Comp inside the Main Comp and repeating the transformation process—scaling it via Layer, Transform, and Fit to Comp Height—forces the low-resolution pixel grid to expand across the high-definition canvas. The immediate visual result is the introduction of authentic aliasing, characterized by harsh "stair-stepping" artifacts along horizontal lines, prominent edge flickering, and a raw digital grit that instantly mimics vintage sensor capture.
Enhancing Nostalgia: Advanced Color Grading and Channel Manipulation
Merely scaling resolution is insufficient to complete the illusion; true Mini DV footage possesses distinct color science and optical anomalies driven by the compact lenses and primitive color-sampling algorithms of 1990s and 2000s consumer cameras. To push the aesthetic further into nostalgic territory, artists must apply targeted color correction and distortion effects within the Main Comp.

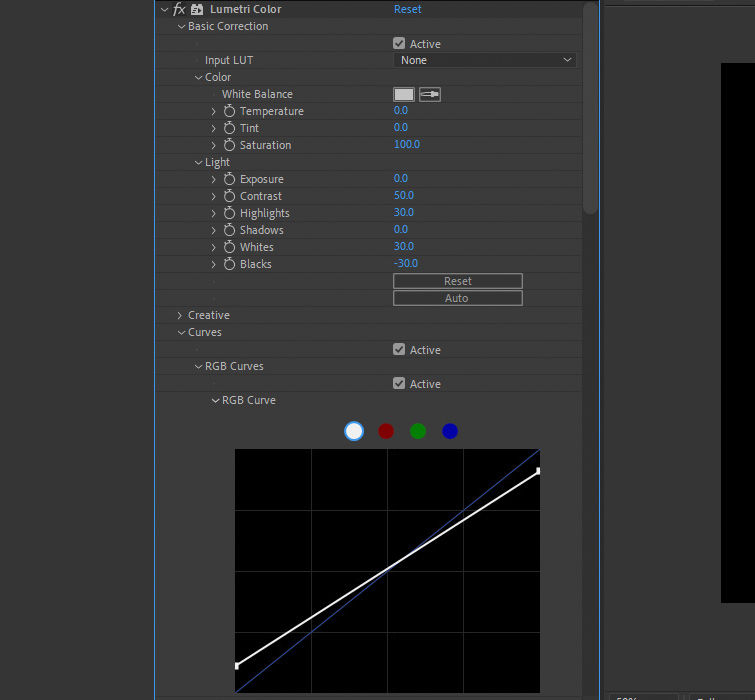
The first enhancement focuses on contrast and luminance. By applying the native Lumetri Color effect to the Mini DV Comp layer, editors can transform flat modern footage into a harsh, high-contrast image reminiscent of inexpensive CCD sensors struggling with dynamic range. Industry-standard recommendations suggest setting the Contrast parameter to 50, Highlights to 30, Whites to 30, and Blacks to -30. For finer control over the luminance curve, adjustments can be made directly to the White and Black points within the RGB Curve interface to clip the shadows and highlights intentionally.
Next, digital color fringing—a hallmark optical artifact of consumer-grade zoom lenses from the era—must be introduced. This is achieved by applying the Channel Blur effect to the layer and adjusting the Blue Blurriness value to approximately 3. This subtle separation of the blue color channel creates a soft chromatic aberration effect bleeding across the edges of objects within the frame.
The final polishing step involves accentuating the digital resolution grid through edge sharpening. Applying the Unsharp Mask effect allows creators to punch up the harsh edges and aliasing introduced during the initial downscaling phase. Setting the Amount parameter to 150 with a Radius of 2 generates an aggressive haloing effect around high-contrast boundaries. These values remain entirely customizable, allowing artists to tailor the intensity of the digital artifacts to match the specific lighting conditions and subject matter of their source media. Once the master template is established, swapping out video clips inside the Mini DV Comp instantly translates the complex processing pipeline to new footage, streamlining production workflows for music video directors and digital content creators alike.
Broader Industry Implications and the Future of Retro Post-Production
The growing popularity of DIY digital emulation tutorials reflects a broader democratization of retro filmmaking techniques. Historically, achieving authentic period-accurate video aesthetics required sourcing, maintaining, and digitizing tapes from aging physical camcorders—a workflow plagued by mechanical tape jams, degraded magnetic ribbon, and expensive firewire capture hardware bottlenecks. By translating these physical degradation processes into software-based procedural workflows, digital artists can bypass hardware maintenance while maintaining complete, non-destructive control over the intensity of their effects.
As digital cinema technology continues to push toward unprecedented levels of cleanliness, dynamic range, and resolution, the counter-movement celebrating low-fidelity texture is expected to expand. Industry analysts note that tools bridging the gap between modern high-definition capture and vintage aesthetic emulation will remain critical staples in the toolkit of contemporary visual storytellers. Whether applied to commercial fashion spots seeking an edgy, unpolished aesthetic or narrative films capturing the turn of the millennium, mastering these digital emulation techniques ensures that creators can reliably command the powerful visual language of nostalgia.